React does a great job out-of-the-box in terms of performance, but, if you have a complex app, you may start to see issues with certain components. Here are five tips that can help you delight your users with a highly-performant app.
1. Measure render times
We can’t improve what we can’t measure, so the first thing we would need to do in order to improve the performance of our React app is to measure the time it takes to render our key components.
In the past, the recommended way of measuring the performance of our components was to use the react-addons-perf package, but the official documentation now points us to the browser’s User Timing API instead.
I’ve written a short article on how to do that here: Profiling React components
2. Use the production build
There are two main reasons why using React’s production builds improves the performance of our app.
The first reason is that the file size for production builds of react and react-dom are much smaller. That means that our users’ browser has to download, parse and execute less stuff, so our page loads faster.
For example, for React 16.5.1 these are the sizes I got:
652K react-dom.development.js
 92K react-dom.production.min.js
 85K react.development.js
9.5K react.production.min.js
That’s a significant difference!
The second reason is that production builds contain less code to run. Things like warnings and profiling information are removed from these builds, so React will be faster.
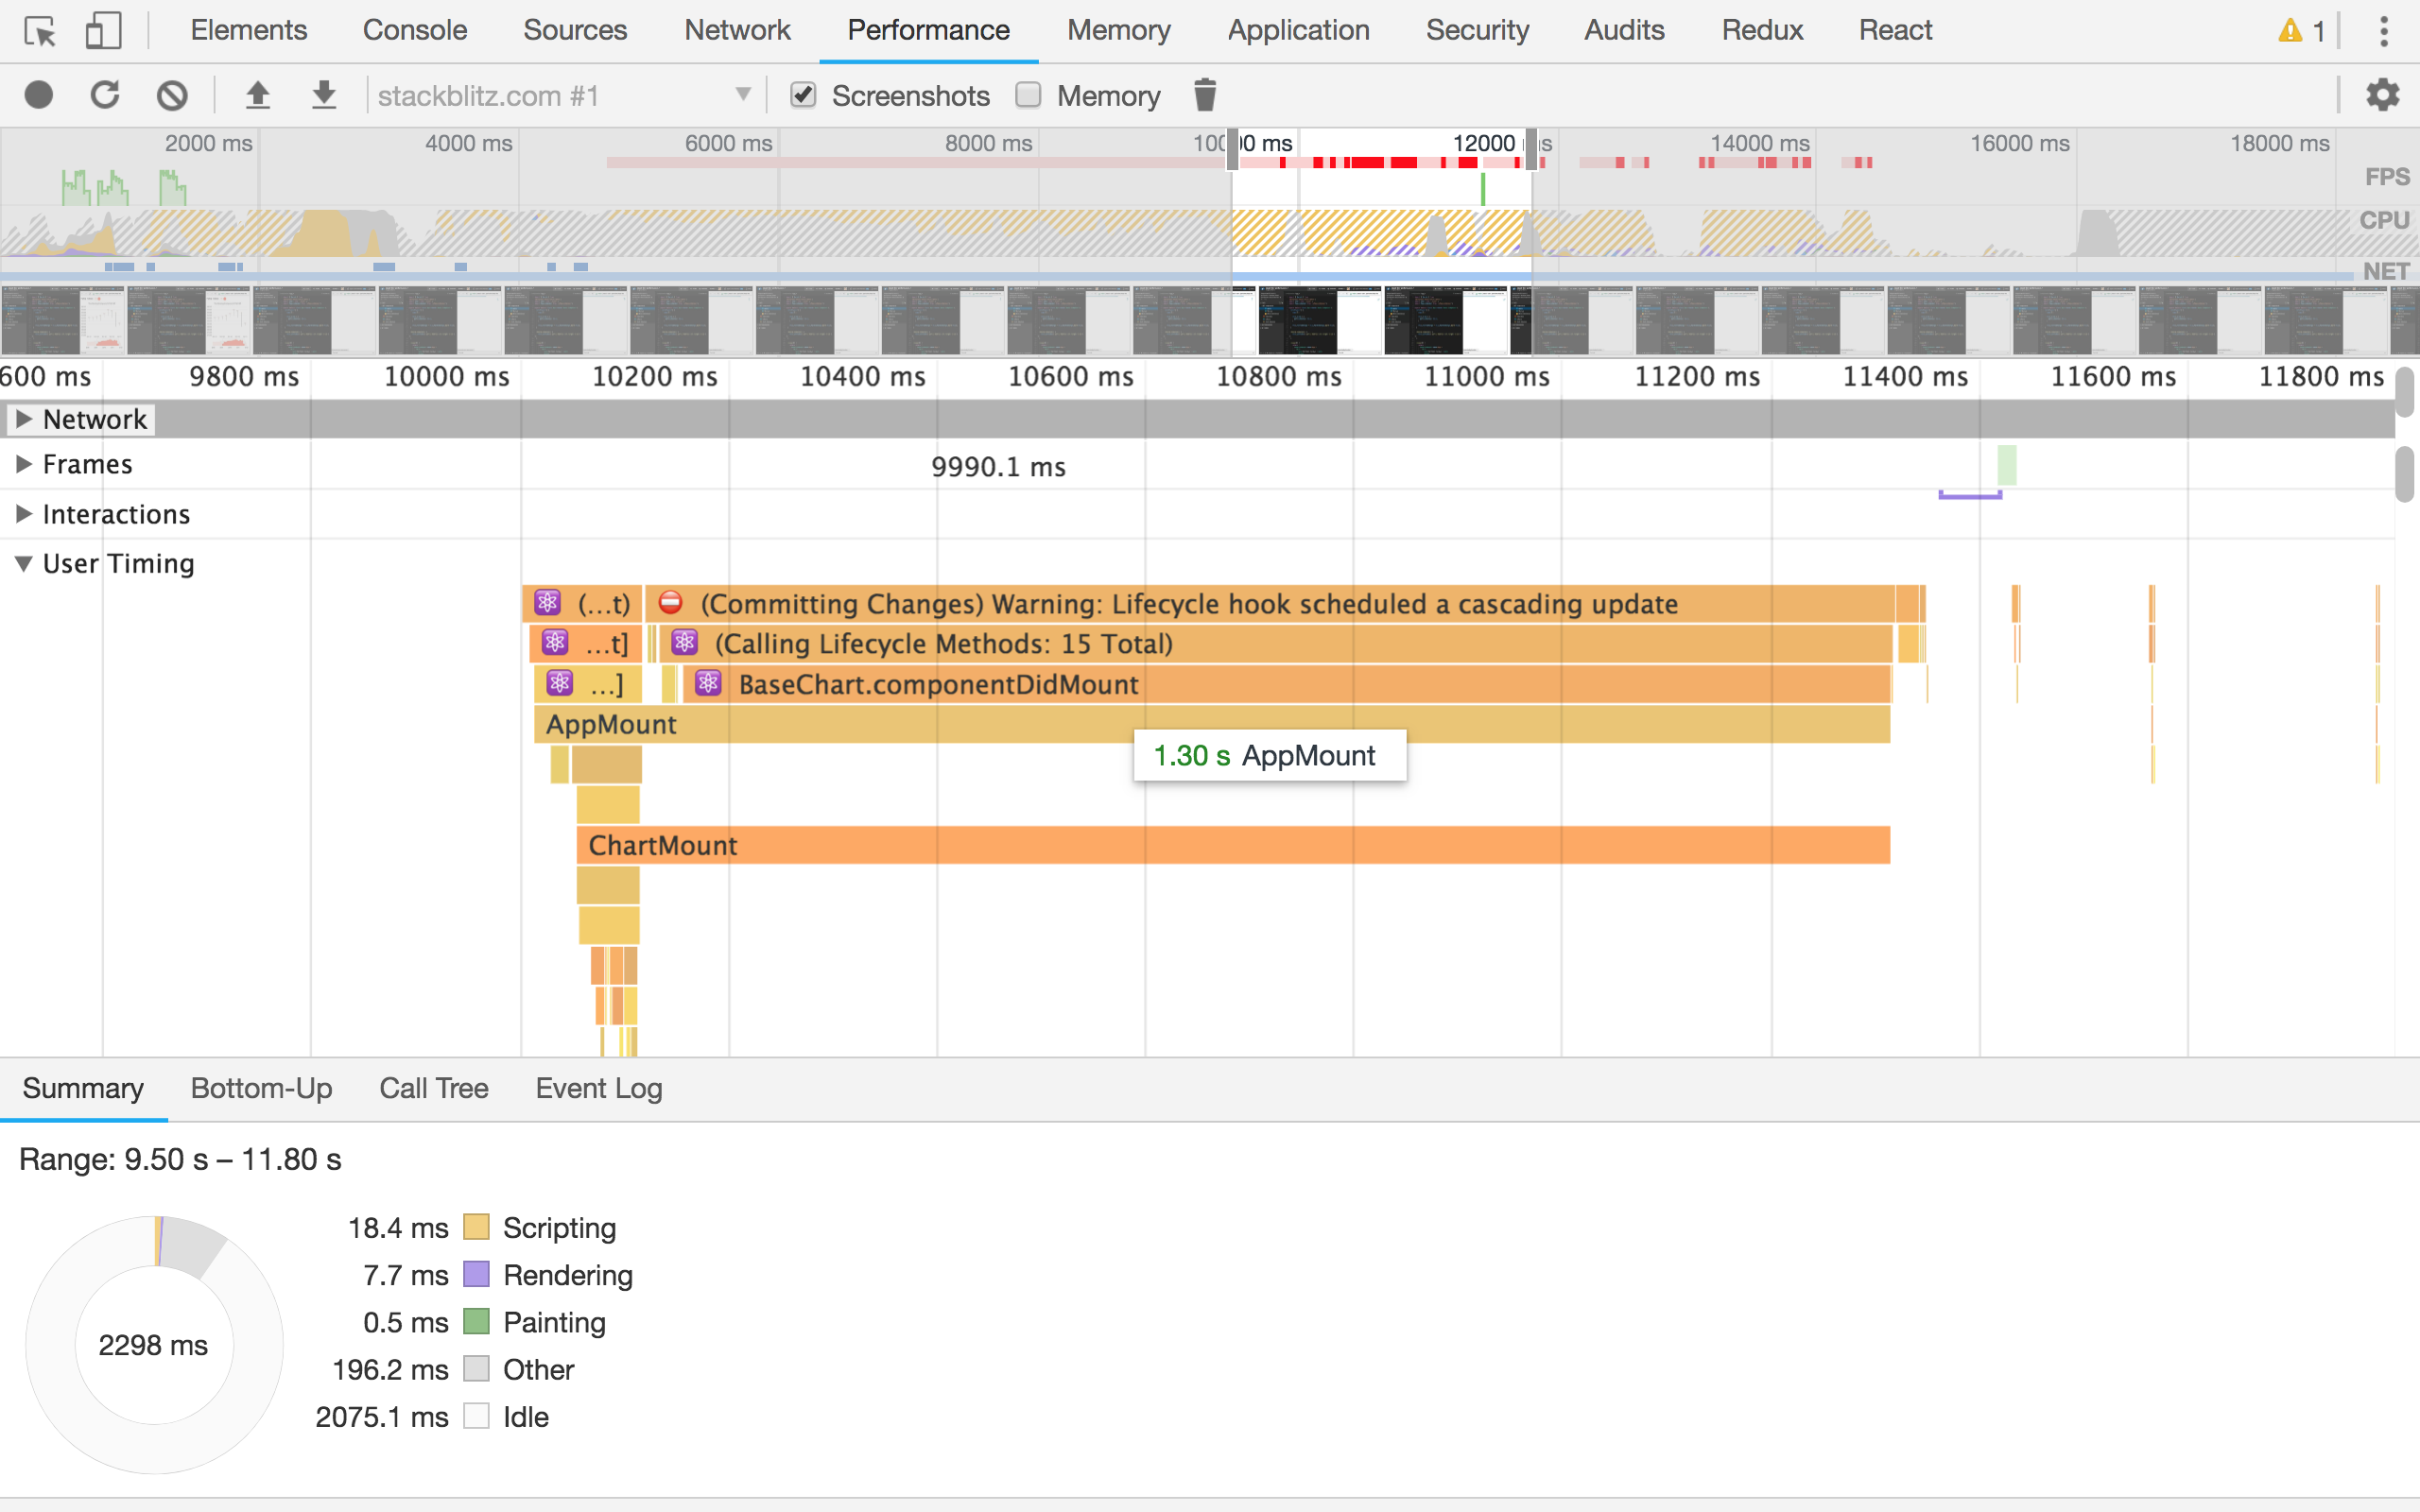
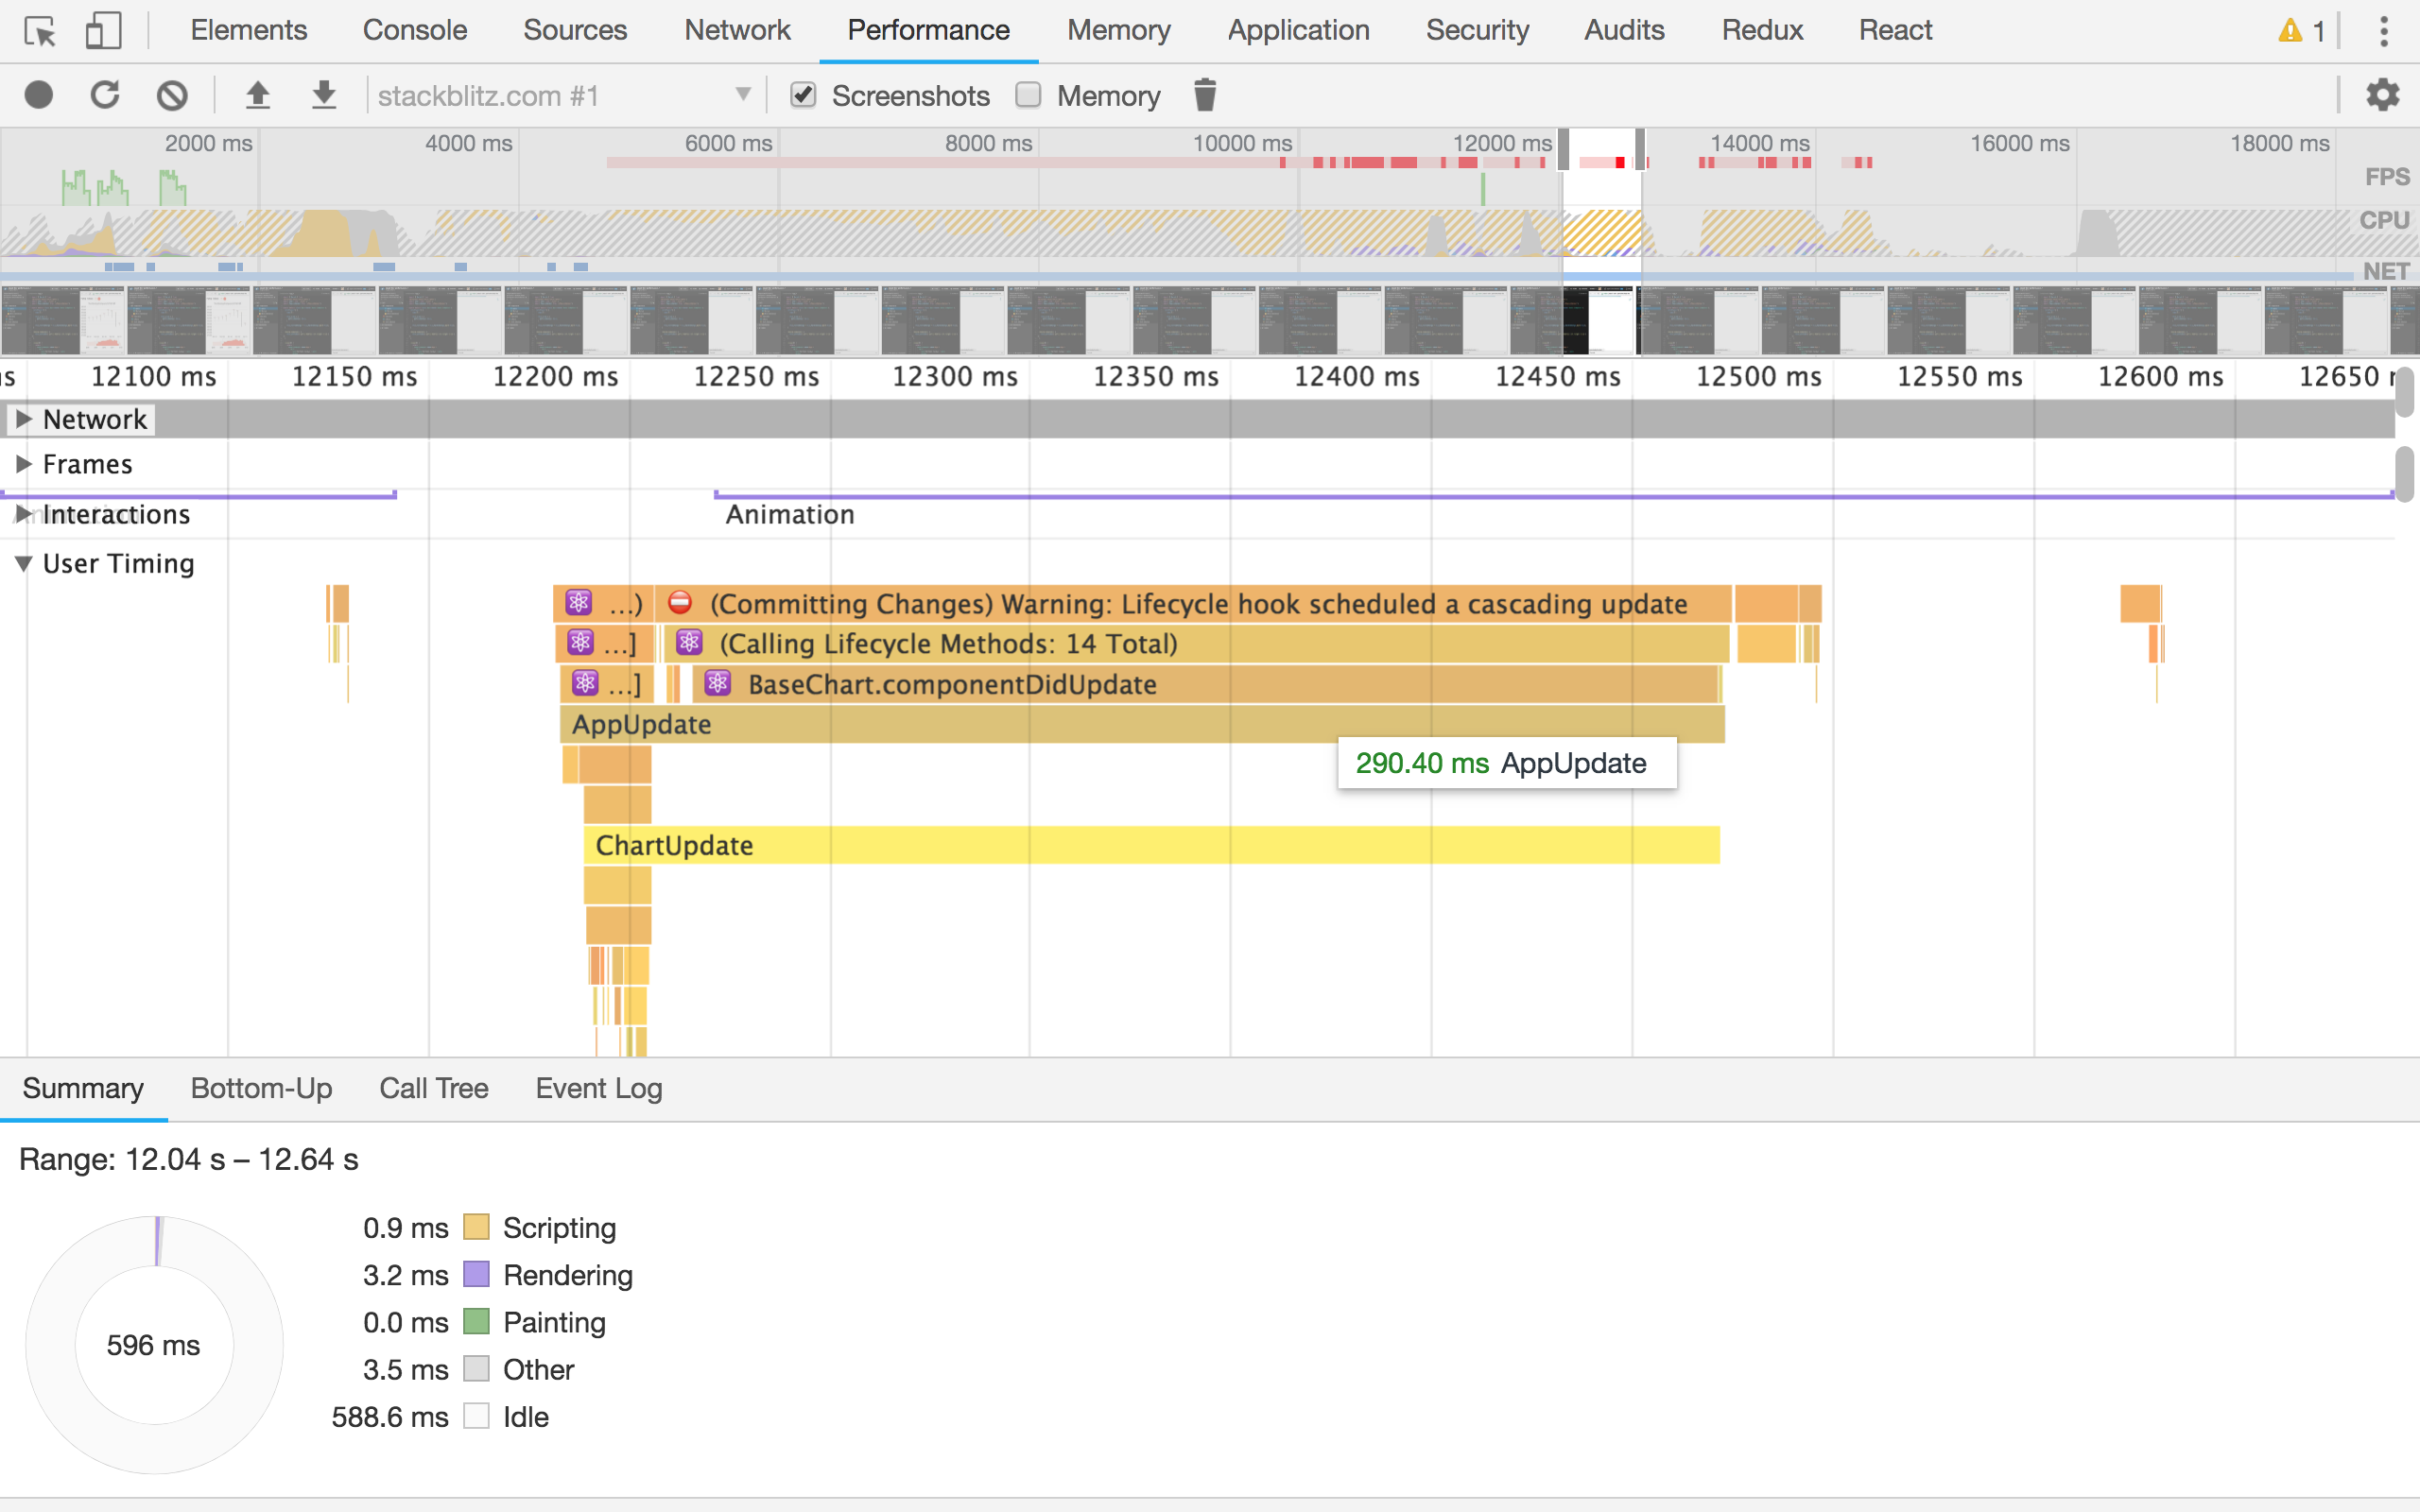
Here’s an example app running React in development mode, with a component being mounted and updated:
And here’s the same example app running React in production mode:
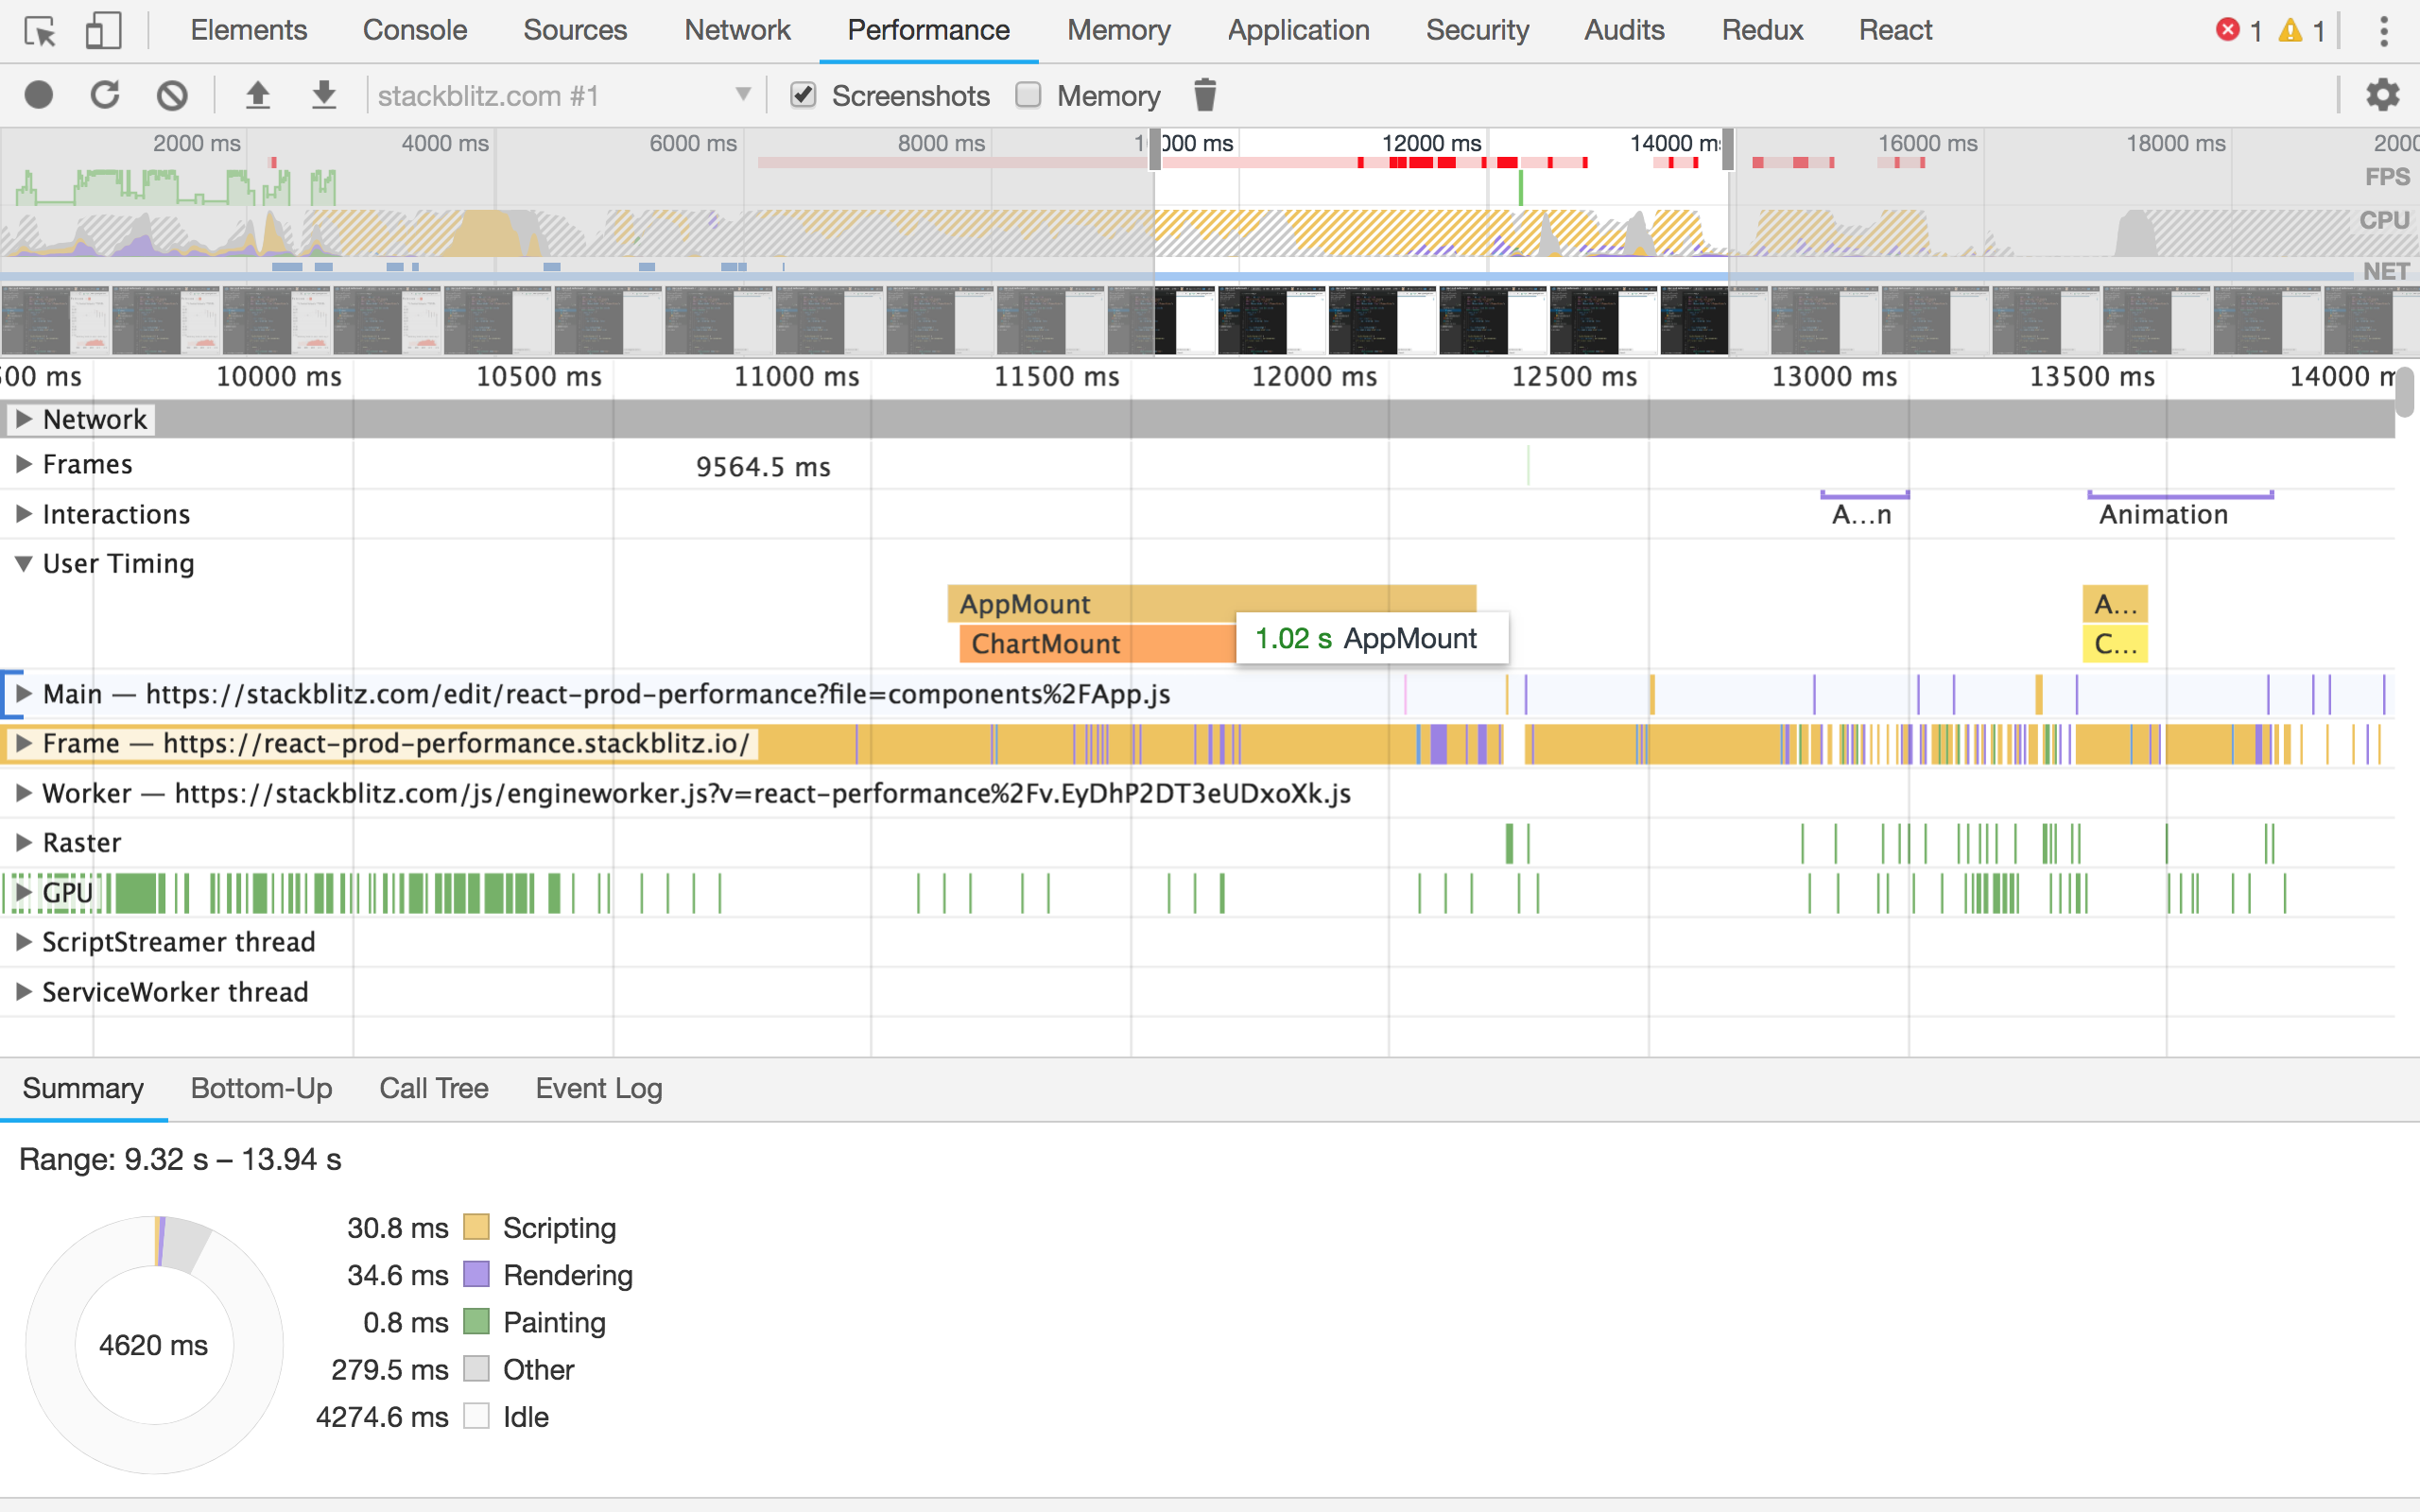
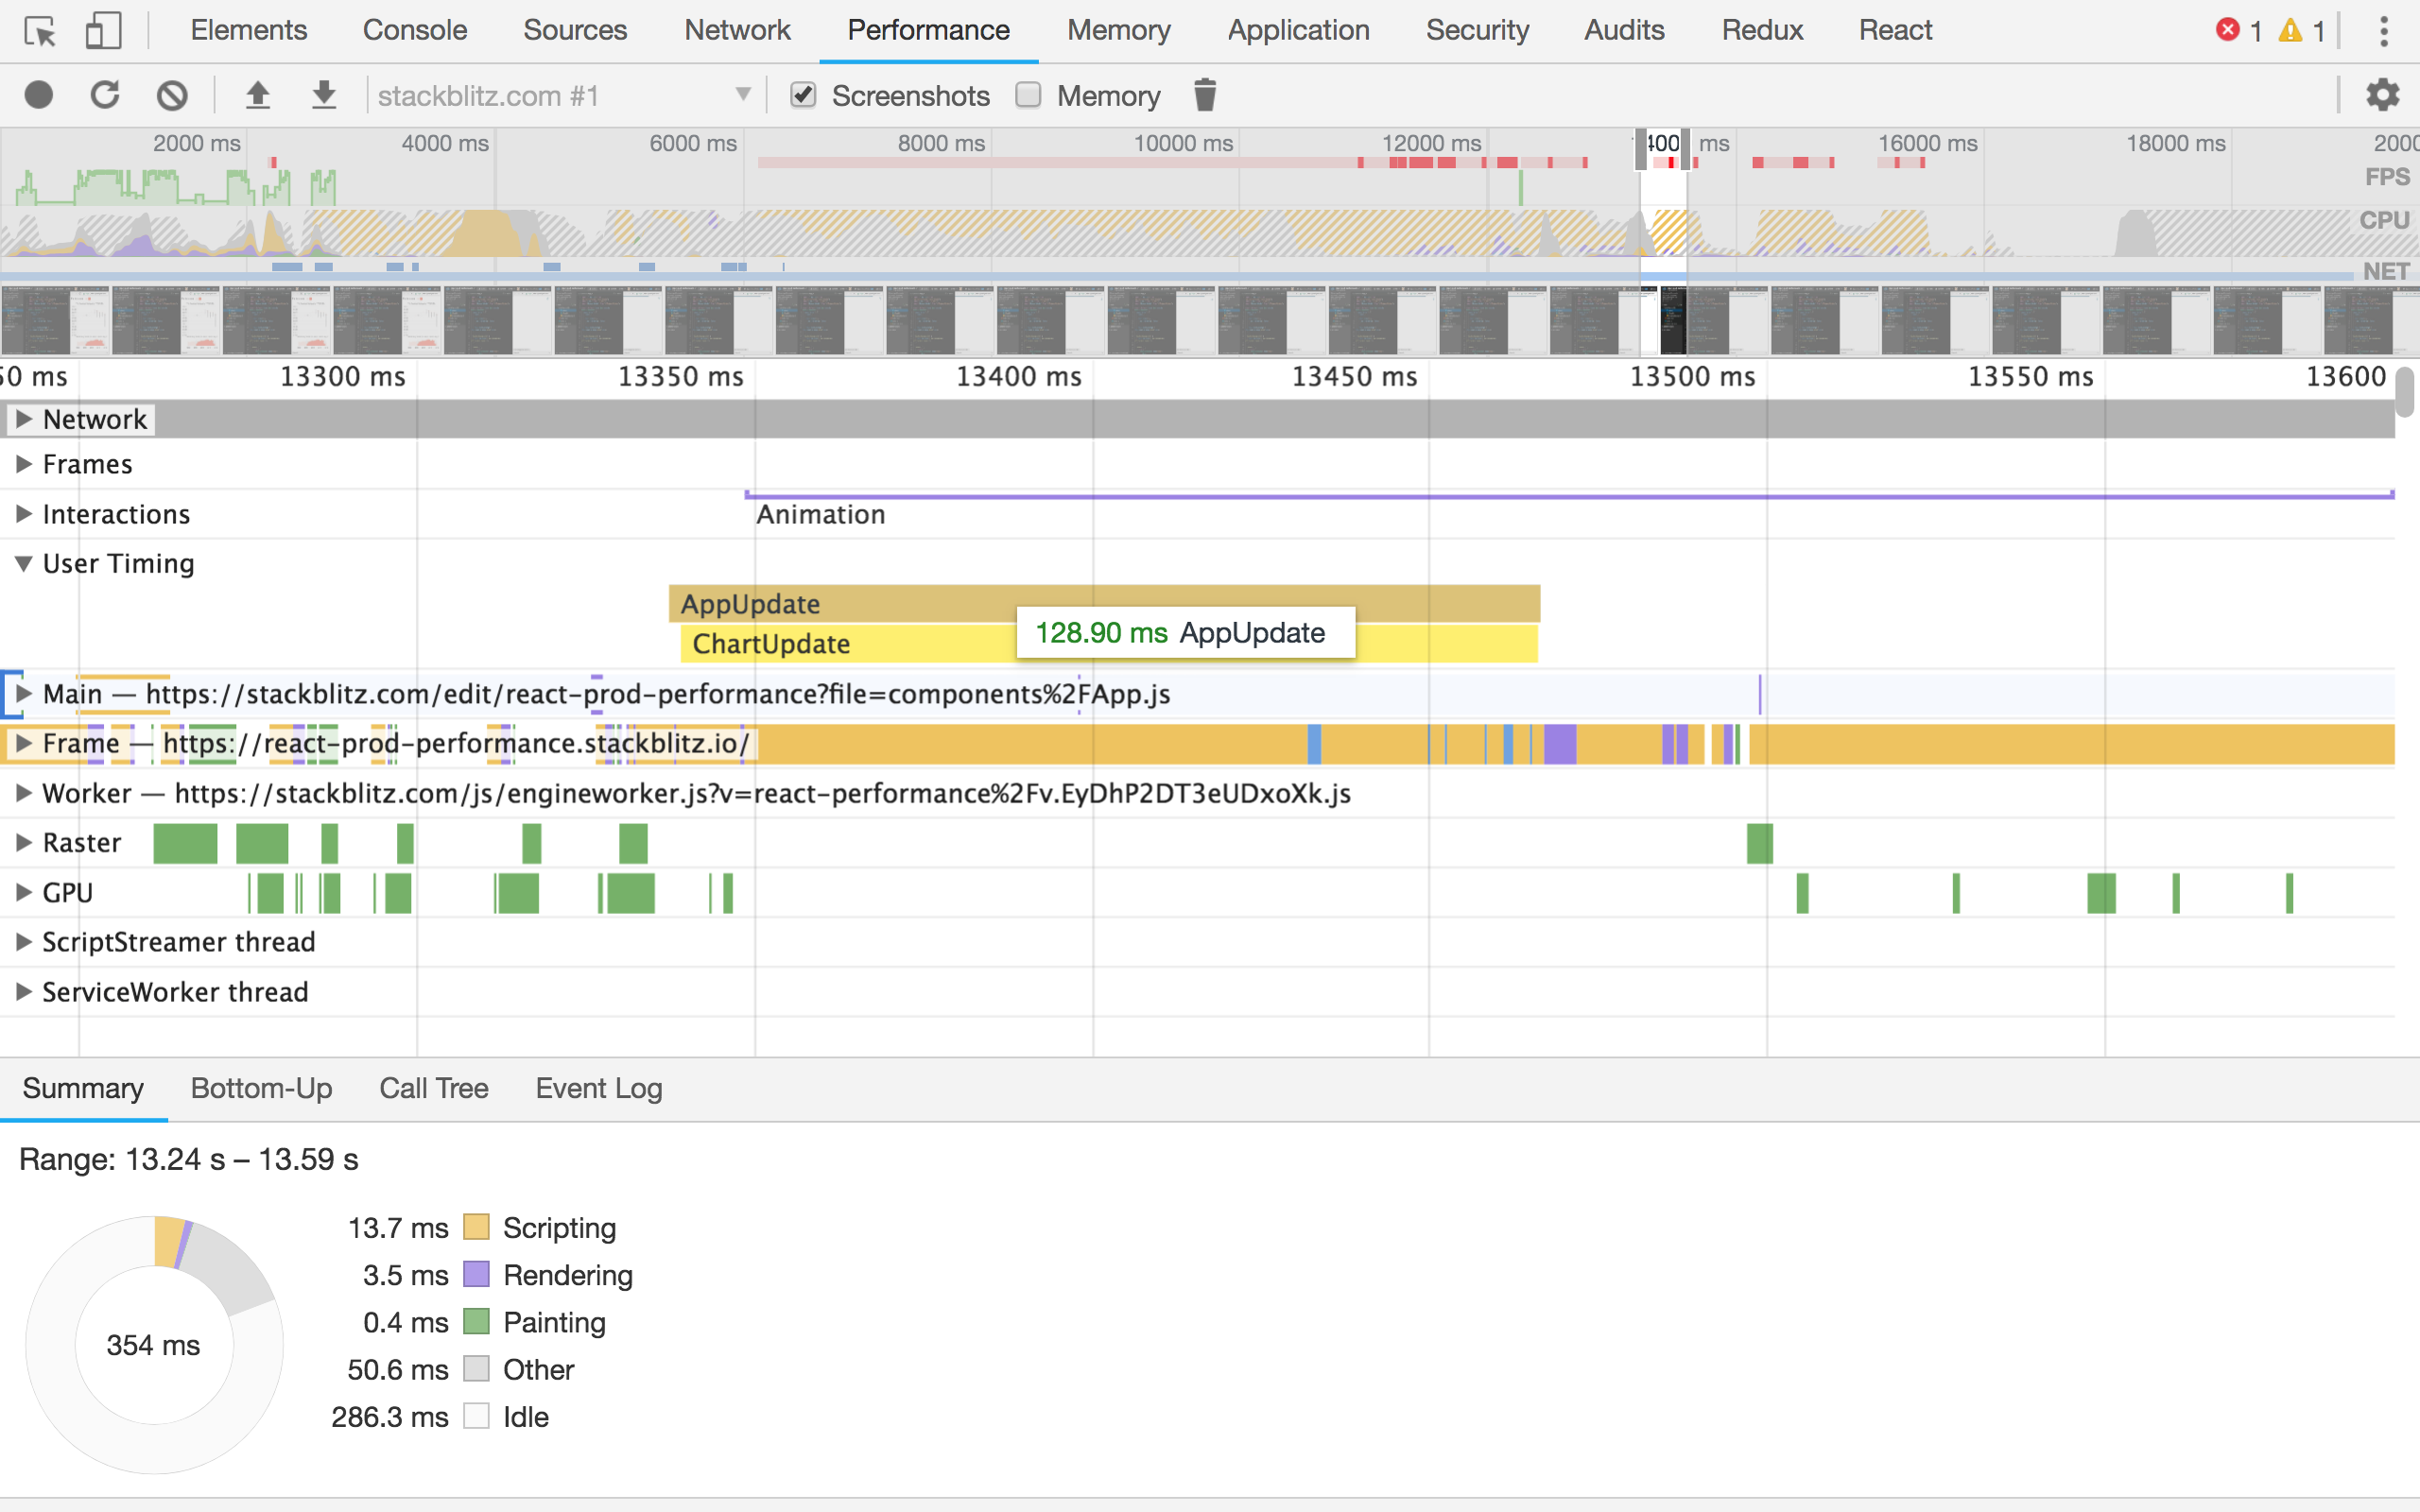
Mount and update times are consistently lower in production mode. That’s why shipping the production build of React to our users is really important!
The React documentation explains how to configure your project to use production builds, with detailed instructions for different tools such as Browserify, Brunch, Rollup, webpack, and Create React App.
3. Virtualize long lists
The more elements we put on the page, the longer it will take for the browser to render it, and the worse the user experience will be. What do we do if we need to show a really long list of items then? A popular solution is to render just the items that fit on screen, listen to scroll events, and show previous and next items as appropriate. This idea is called “windowing” or “virtualizing”.
You can use libraries such as react-window or react-virtualized to implement your own virtualized lists. If you are using Kendo UI’s Grid component, it has virtualized scrolling built in, so there’s nothing else for you to do.
Here’s a small app that uses a virtualized list:
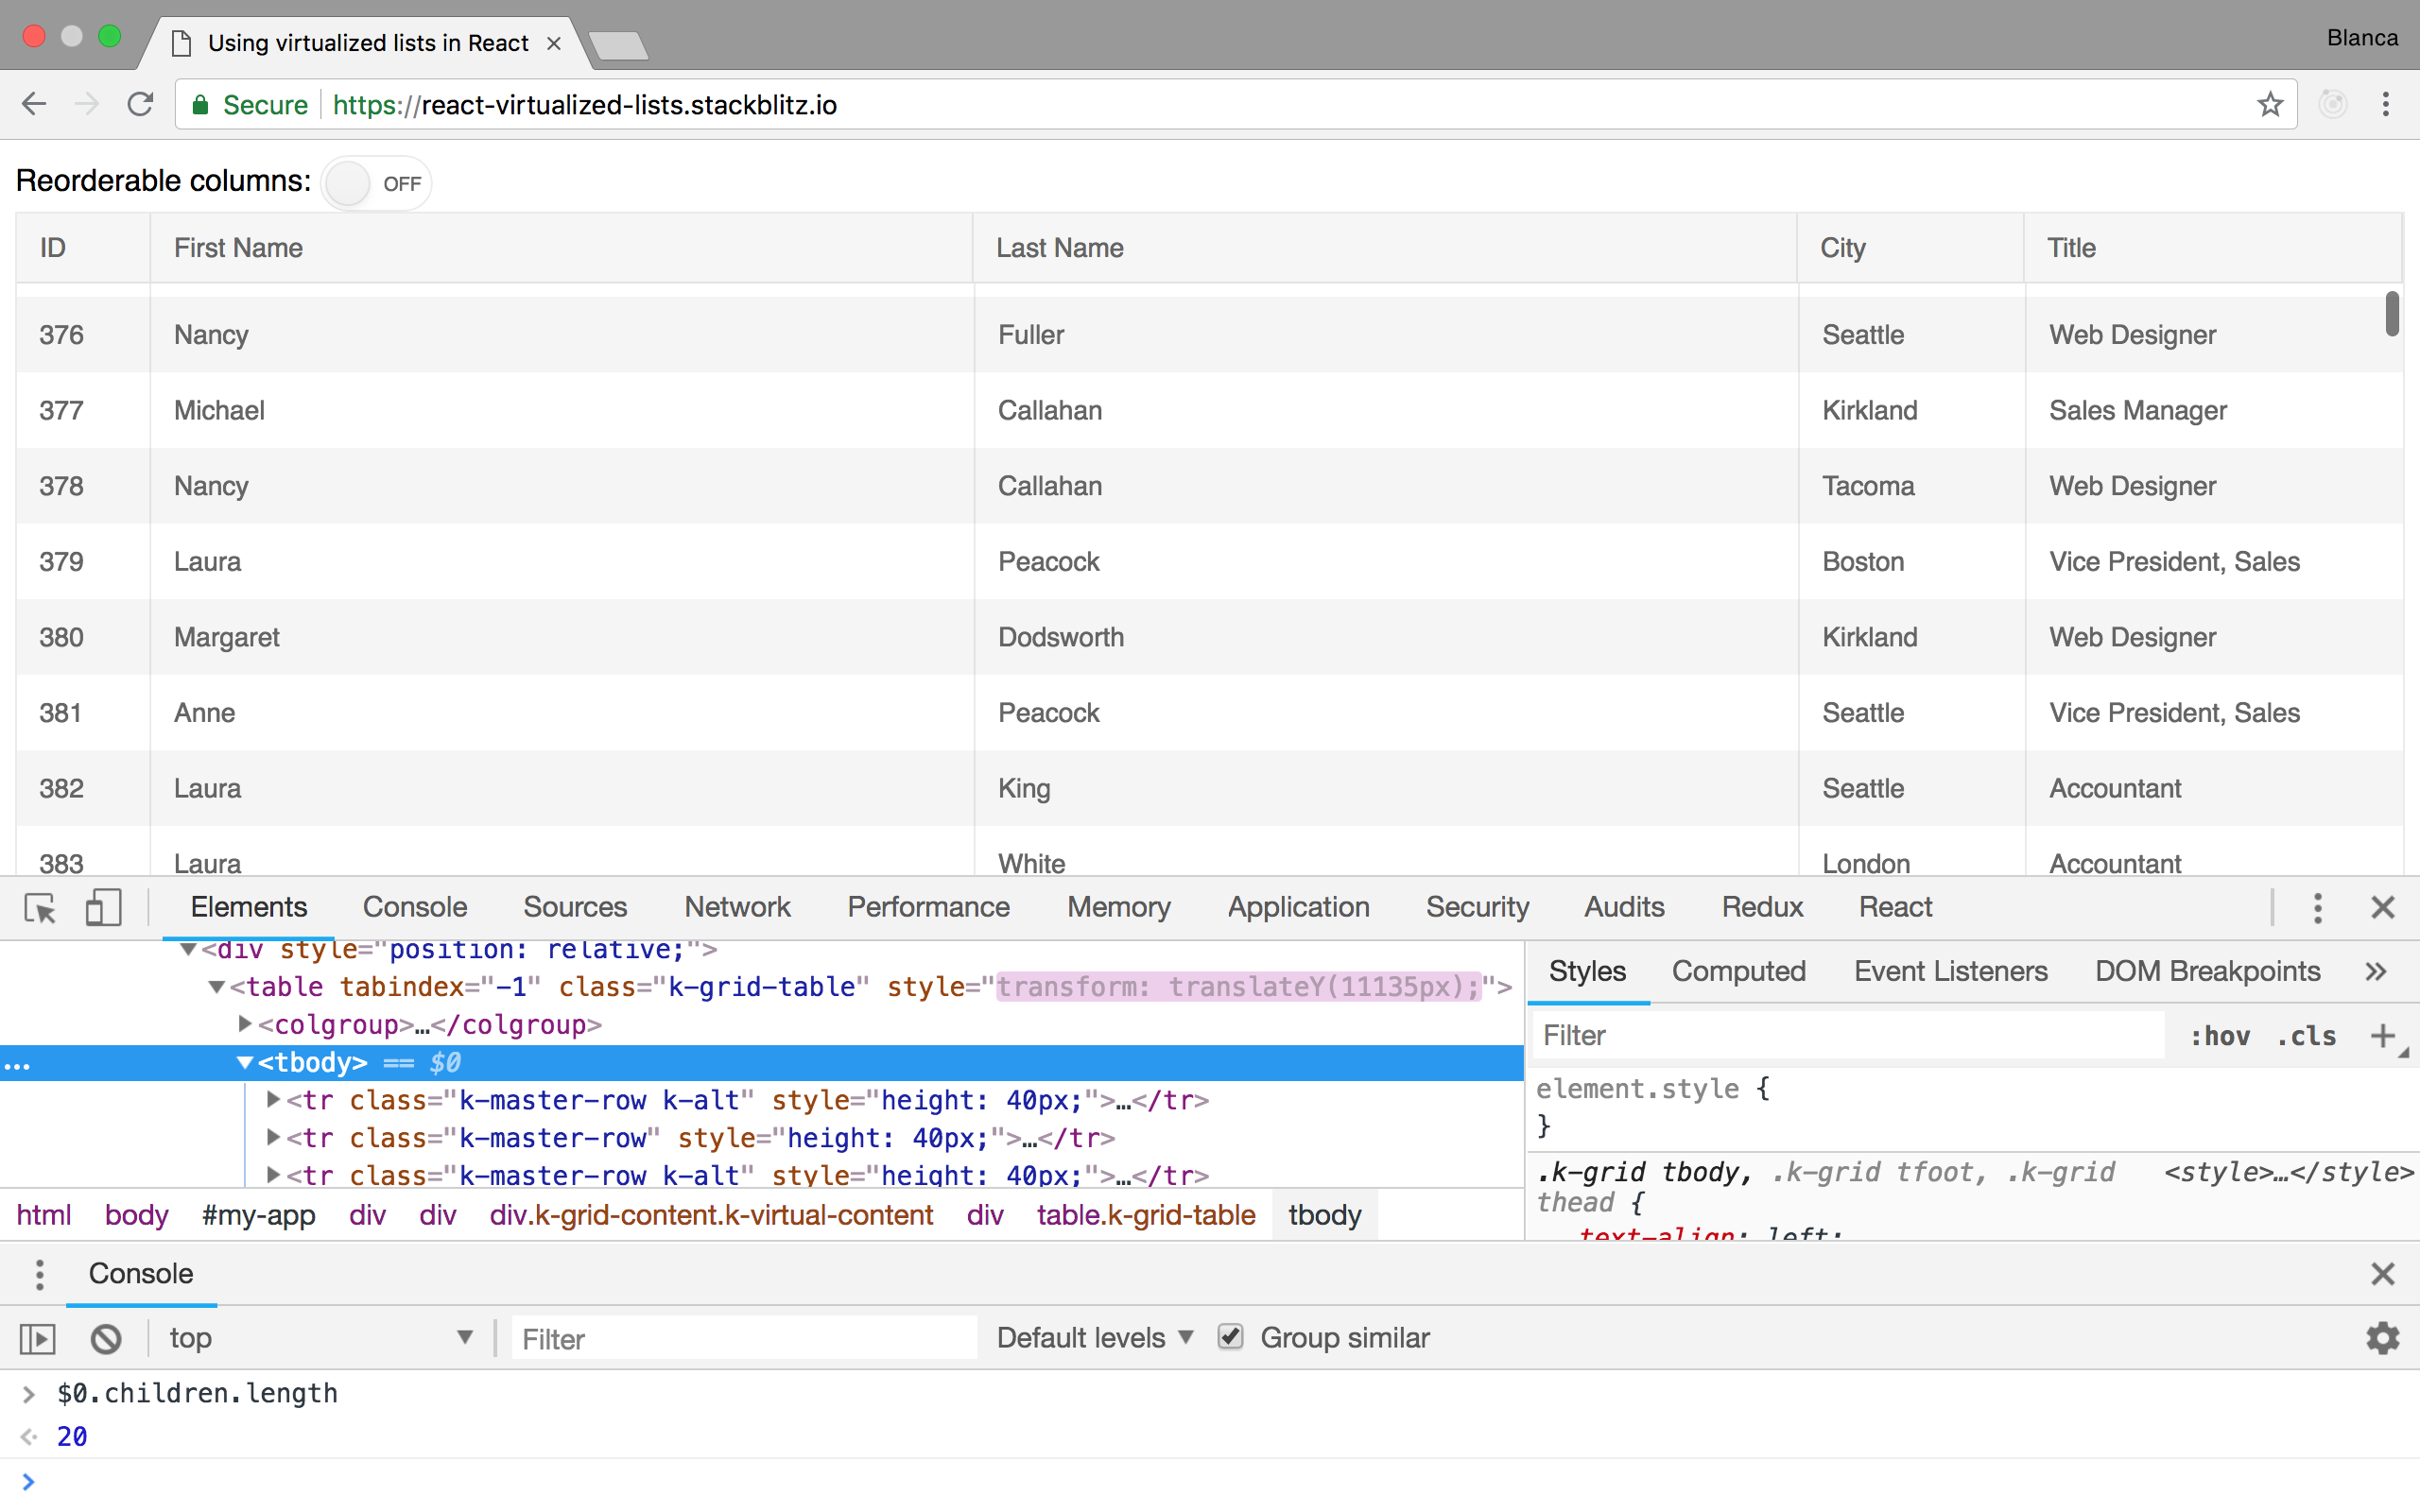
Notice how the DOM shows there are only 20 tr nodes inside that tbody, even though the table contains 50,000 elements. Imagine trying to render those 50,000 elements upfront on a low-end device!
4. Avoid reconciliation with PureComponent
React builds an internal representation of the UI of our app based on what we return in each of our components’ render method. This is often called the virtual DOM. Every time that a component’s props or state change, React will re-render that component and its children, compare the new version of this virtual DOM with the old one, and update the real DOM when they are not equal. This is called reconciliation.
We can see how often our components re-render by opening the React Dev Tools and selecting the Highlight Updates checkbox:
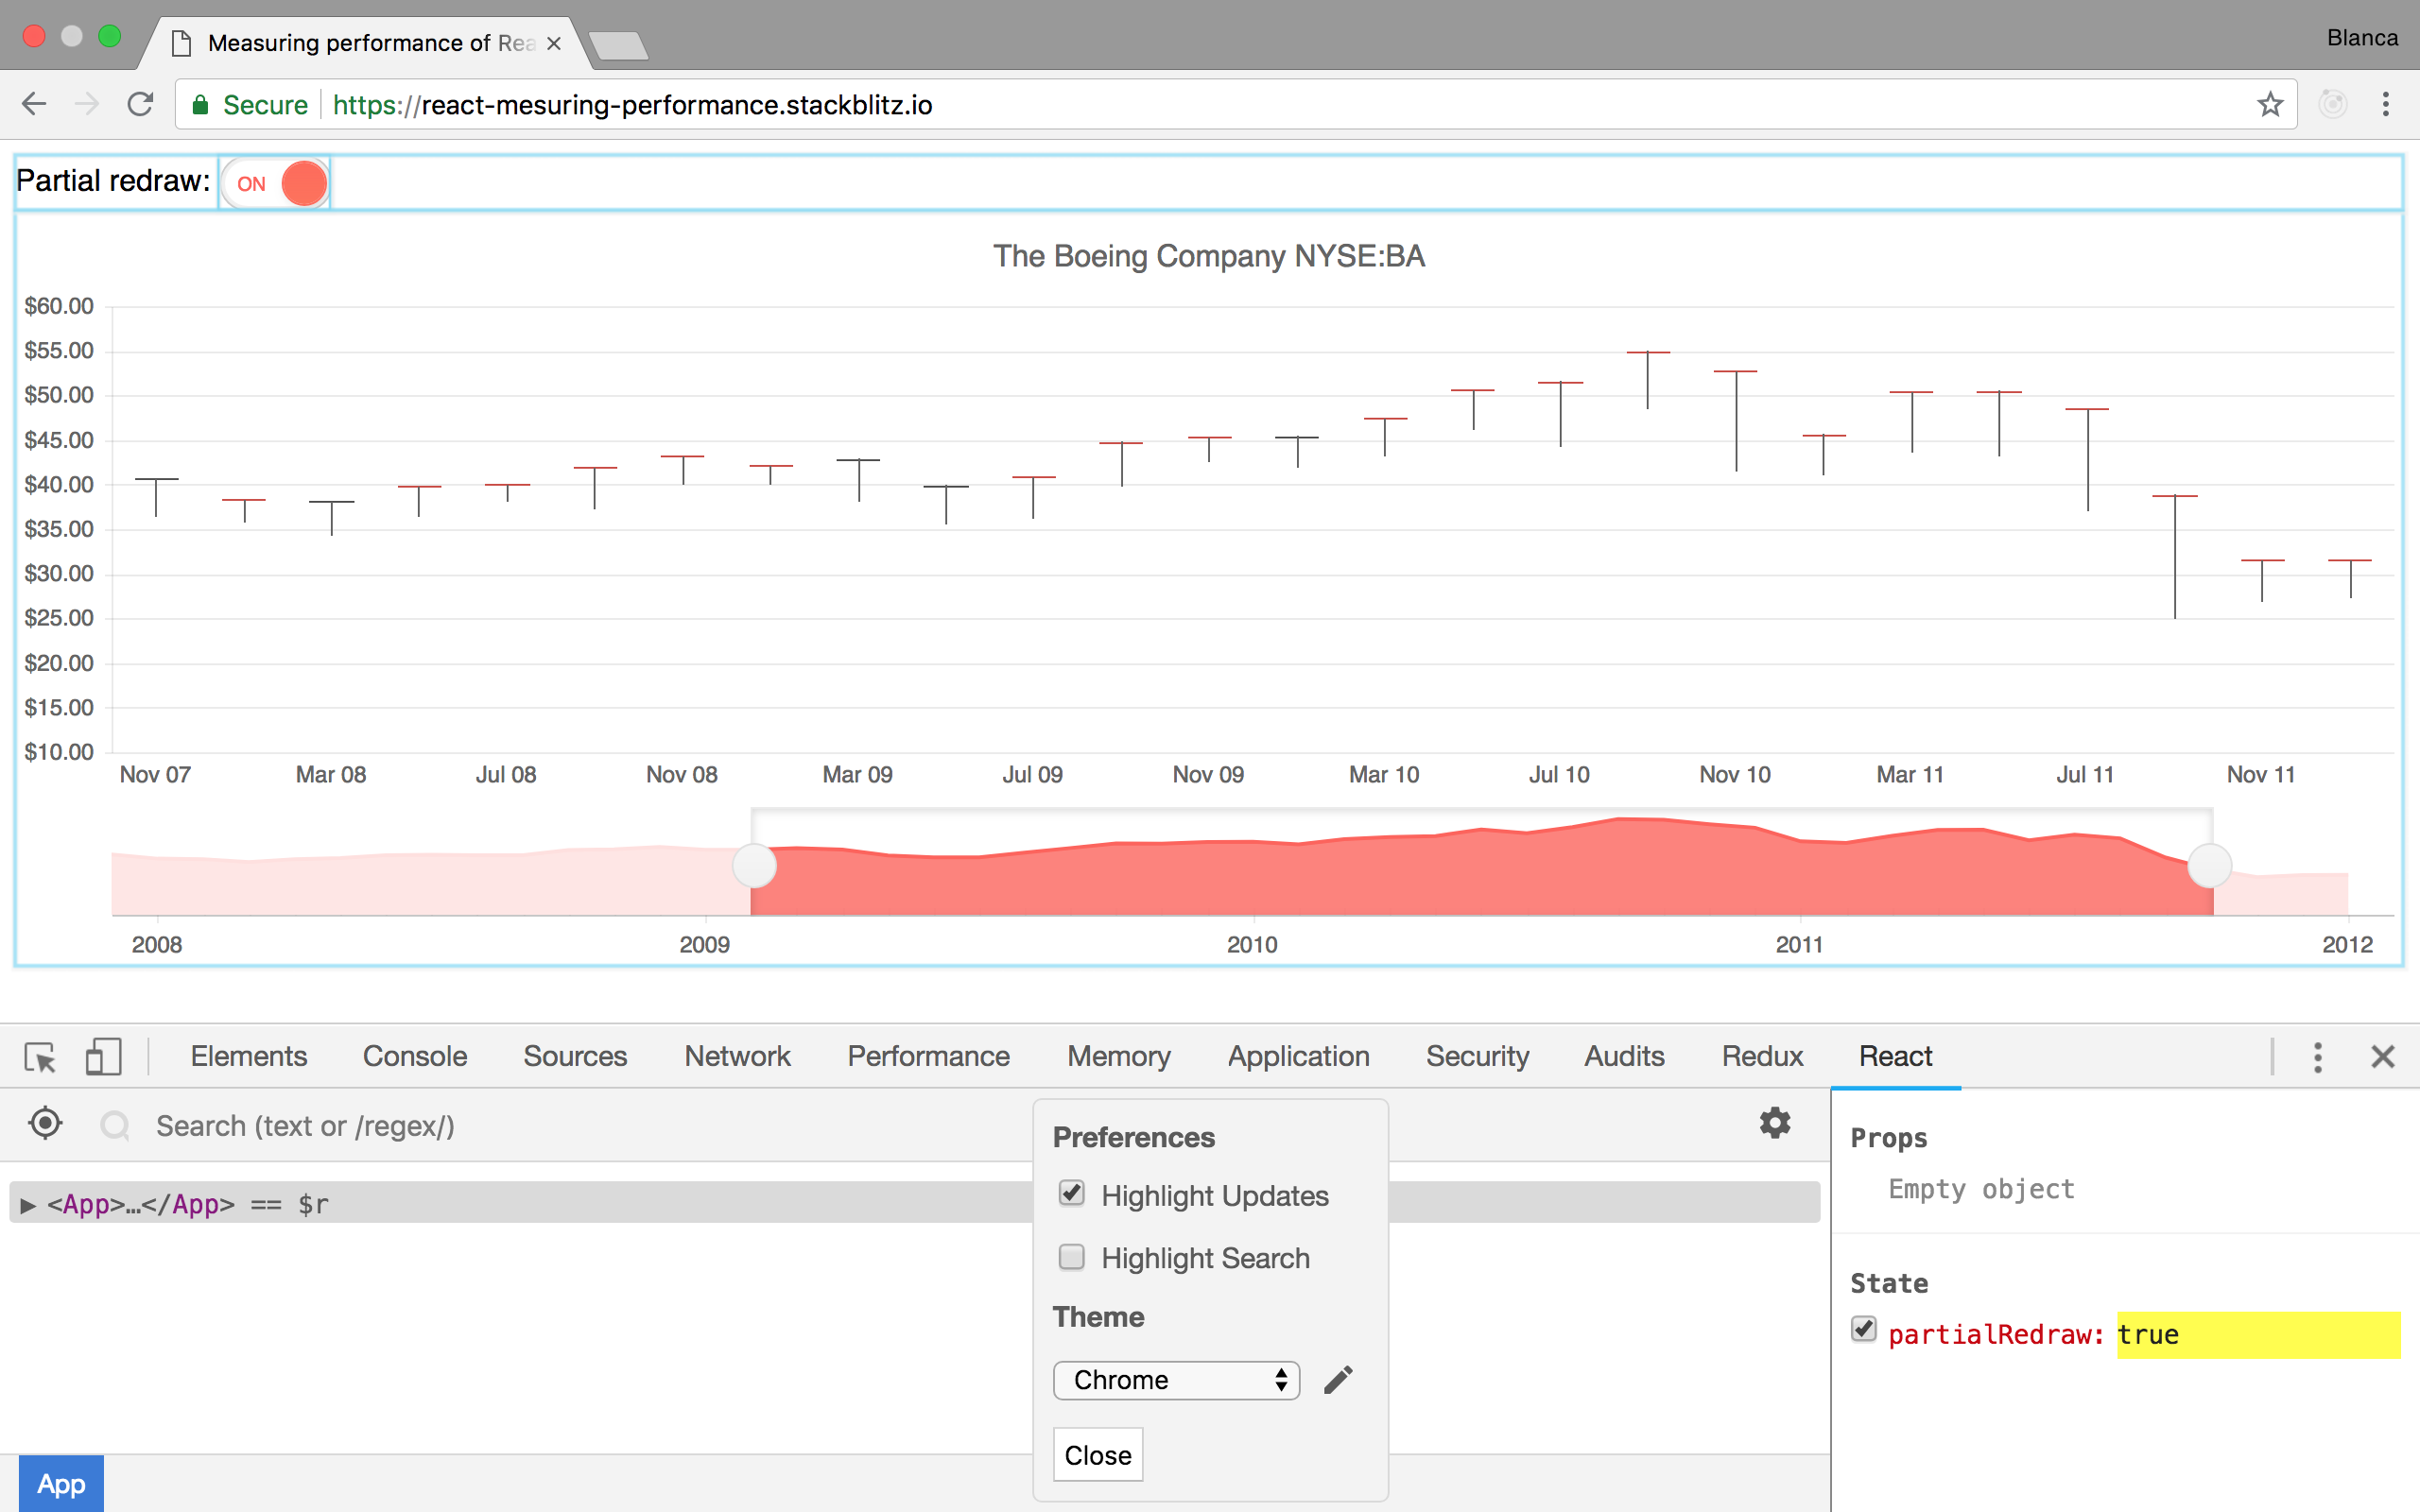
Now, every time a component re-renders, we’ll see a colored border around it.
Rendering a component and running this reconciliation algorithm is usually very fast, but it’s not free. If we want to make our app perform great, we’ll need to avoid unnecessary re-renders and reconciliations.
One way of avoiding unnecessary re-renders in a component is by having it inherit from React.PureComponent instead of React.Component. PureComponent does a shallow comparison of current and next props and state, and avoids re-rendering if they are all the same.
In this example app using PureComponent we’ve added a console.log to each component’s render method:
class App extends React.Component {
  render() {
    console.log('App rendered');
    return (
      <React.Fragment>
        <Buttons />
        <Count />
      </React.Fragment>
    );
  }
}
class Buttons extends React.PureComponent {
  render() {
    console.log('Buttons rendered');
    return /* ... */;
  }
}
class Count extends React.Component {
  render() {
    console.log('Count rendered');
    return /* ... */;
  }
}
When we interact with the buttons, we can see that App and Count get re-rendered, but Buttons doesn’t, because it inherits from PureComponent, and neither its props nor its state are changing:
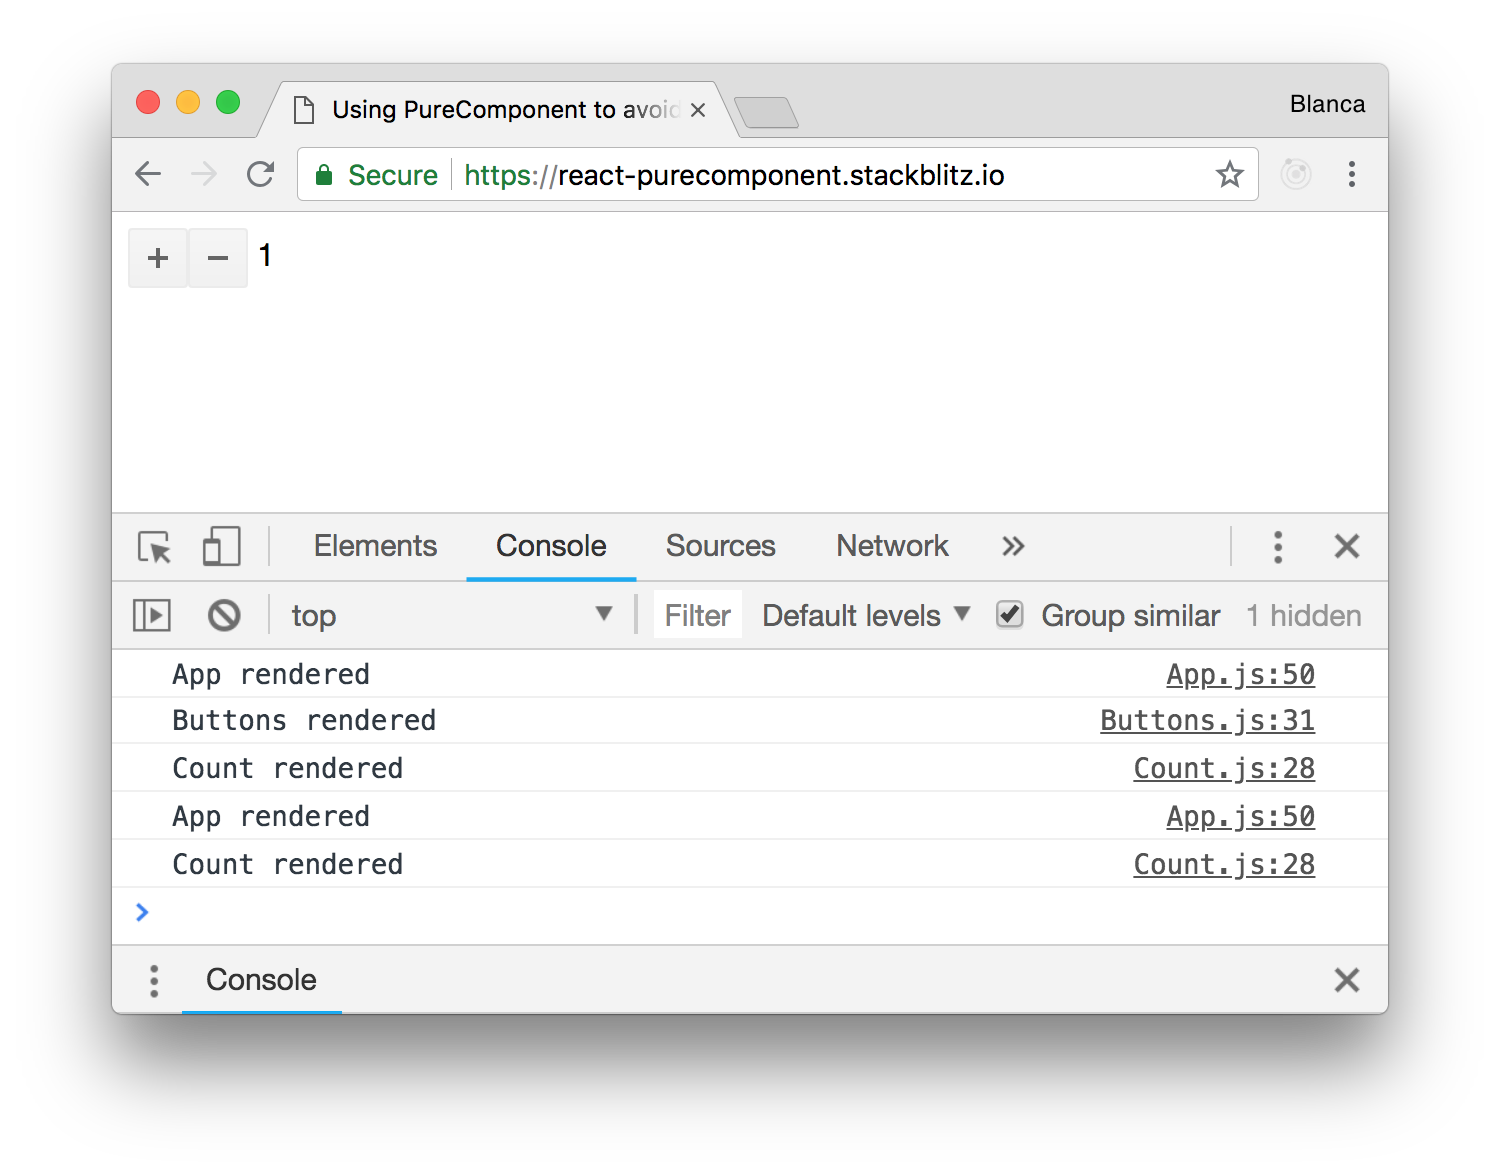
It’s probably not wise to use PureComponent everywhere though, because there’s a cost associated to that shallow comparison for props and state on every re-render. When in doubt, measure!
5. Avoid reconciliation with shouldComponentUpdate
One caveat when using PureComponent is that it will not work as expected if you are mutating data structures in your props or state, because it’s only doing a shallow comparison! For example, if we want to add a new element to an array, we have to ensure that the original array is not being modified, so we’d have to create a copy of it instead:
// Bad
const prevPuppies = this.props.puppies;
const newPuppies = prevPuppies;
newPuppies.push('🐶');
console.log(prevPuppies === newPuppies); // true - uh oh...

// Good
const prevPuppies = this.props.puppies;
const newPuppies = prevPuppies.concat('🐶');
console.log(prevPuppies === newPuppies); // false - nice!
(Avoiding mutation is probably a good idea anyways, but hey, maybe it makes sense in your case.)
Another caveat is that, if your component inheriting from PureComponent receives children as props, these children will be different objects every time the component re-renders, even if we are not changing anything about them, so we’ll end up re-rendering regardless.
What PureComponent is doing under the hood is implementing shouldComponentUpdate to return true only when current and next props and state are equal. So if we need more control over our component lifecycle, we can implement this method ourselves!
In this example app using shouldComponentUpdate, we’ve forced Buttons to never re-render:
class Buttons extends React.Component {
  shouldComponentUpdate() {
    return false;
  }

  render() {
    console.log('Buttons rendered');
    return /* ... */;
  }
}
The effect is the same as before, where Buttons doesn’t re-render unnecessarily, but we don’t incur in the cost of doing a shallow comparison of props and state:
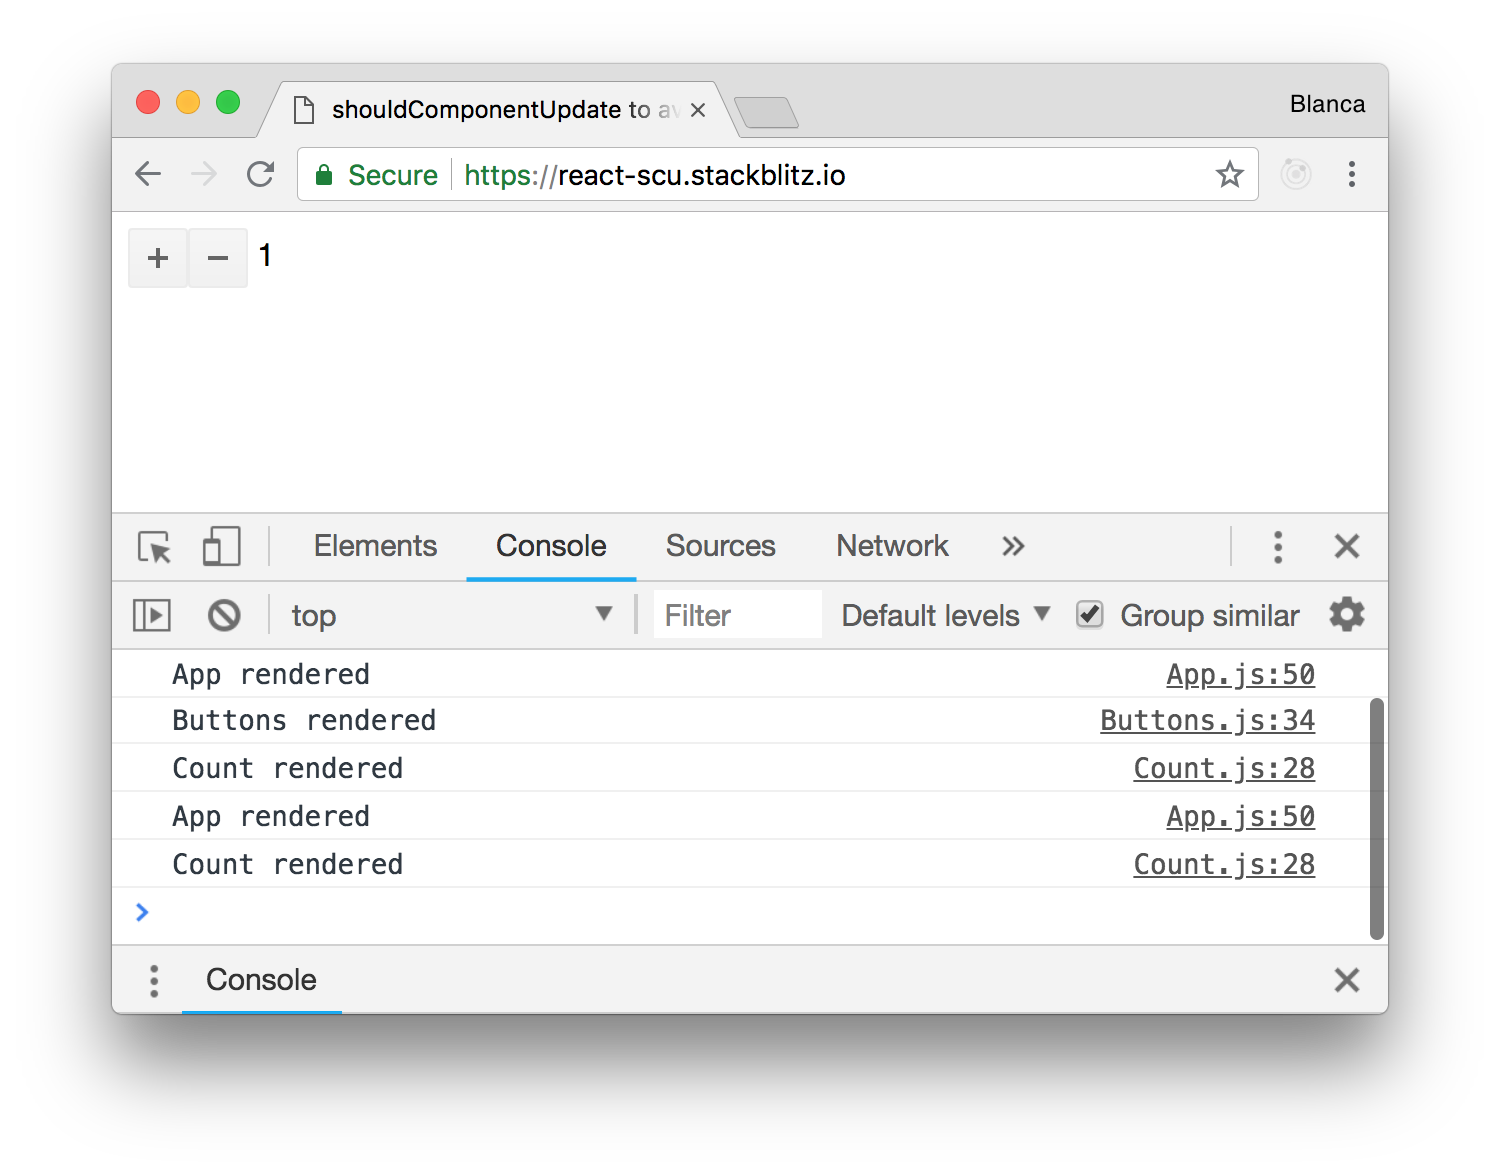
The downside is that implementing shouldComponentUpdate by hand is error-prone, and could introduce difficult-to-detect bugs in your app, so tread with care.
Conclusion
Even though React’s use of a virtual DOM means that the real DOM only gets updated when strictly necessary, there are plenty of things you can do to help React do less work, so that your app performs faster. Hopefully these tips will help you give your app that extra boost it needs!
This post was originally published at https://www.telerik.com/blogs/top-5-performance-tips-for-react-developers.